
Want a coconut yogurt that is deliciously creamy, slightly tangy and with no funky additives? Not to mention – full of gut-healthy probiotics? Read on…
So, I LOVE yogurt but I try to limit my consumption of dairy – so I buy plant-based yogurt.
My favorite up until now has been cashew yogurt – specifically, Forager’s Vanilla Bean Cashew Yogurt. However, it can be pricey…
I’ve tried coconut yogurt many times in the past, but never liked it. Then I got curious about making my own homemade coconut yogurt and looked it up to see how difficult it would be. I was excited to see that it’s surprisingly easy!
Not only was it easy to make, but it’s the best-tasting coconut yogurt I’ve ever tried.

I’m seriously addicted to this yogurt now!
Unlike the store-bought versions, it actually tastes like coconut, and it’s actually creamy and slightly tangy – the way you’d hope it would be.
And even better – it’s just pure coconut yogurt, with no funky stuff added.
If you’d like a video for reference, I followed along with this video by Minimalist Baker in learning how to make it.
Even if you think you don’t like plant-based yogurt, give this one a try. Aside from the great taste, it’s pretty cool to be able to say that you made your own yogurt 😎
Oh – and be sure to try this out as the base for the yogurt parfait that I talked about last week or watch it in my new video, Healthy Eating Hacks.
Directions:
1. Empty a can of full-fat coconut milk (I like this kind) into a clean glass jar (use a jar with a wide mouth so that you can stir easily). Ideally, you should first sterilize the jar by rinsing with recently boiled water.
2. Stir with a whisk or wooden spoon to smooth out any lumps. If using a metal whisk, first rinse it with recently boiled water and then let it cool off.
3. Add 2-3 capsules of probiotics to the jar (open the capsules and drop the powder into the mixture. Can be any type of probiotics, but make sure it’s not a probiotic that also contains prebiotic – it will say on the label).
4. Now stir the mixture with a wooden spoon, using the spoon against the chart of smooth out any clumps that might form from the powder. Important – Once you add the probiotics, do not use metal utensils in the jar or it will hurt the fermentation process.
5. Put some cheesecloth on over the mouth of your jar & secure with a rubber band – do not put a lid on!
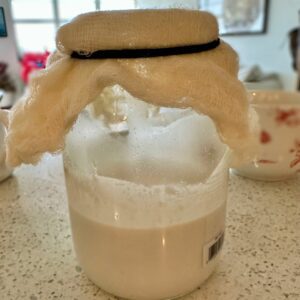
- Jar covered with cheesecloth
6. Let the jar sit out in a relatively warm place for approximately 24-48 hours (I left mine out for 48 hours). If you don’t have a warm spot in your house, you can put it in an oven that is not turned on (important- make sure everyone in your house knows it’s inside the oven so it doesn’t accidentally get turned on – don’t ask me how I know about this 😂).
7. After 24 hours, dip your wooden spoon in to taste the yogurt. It should have a pleasantly tangy taste. If it’s still doesn’t taste yogurt-like, then leave it out for the full 48 hours. Note – it should not smell “off” in anyway. It should smell and taste like yogurt. If it smells bad, throw it away!
8. When it’s out of the fridge, your yogurt will likely have a runny consistency. Not to worry, it will solidify in the fridge!
9. Once your yogurt has sat out long enough, and you’re satisfied with the taste, take off the cheese cloth, put on the lid and keep it in the fridge. It should last at least a week – although you’ll probably finish it much faster than that 😊
Let me know if you try this and how it worked out for you!
*this post contains affiliate links – if you purchase through my link, I will make a small commission, at no extra cost to you.


0 Comments